Thursday, May 2, 2013

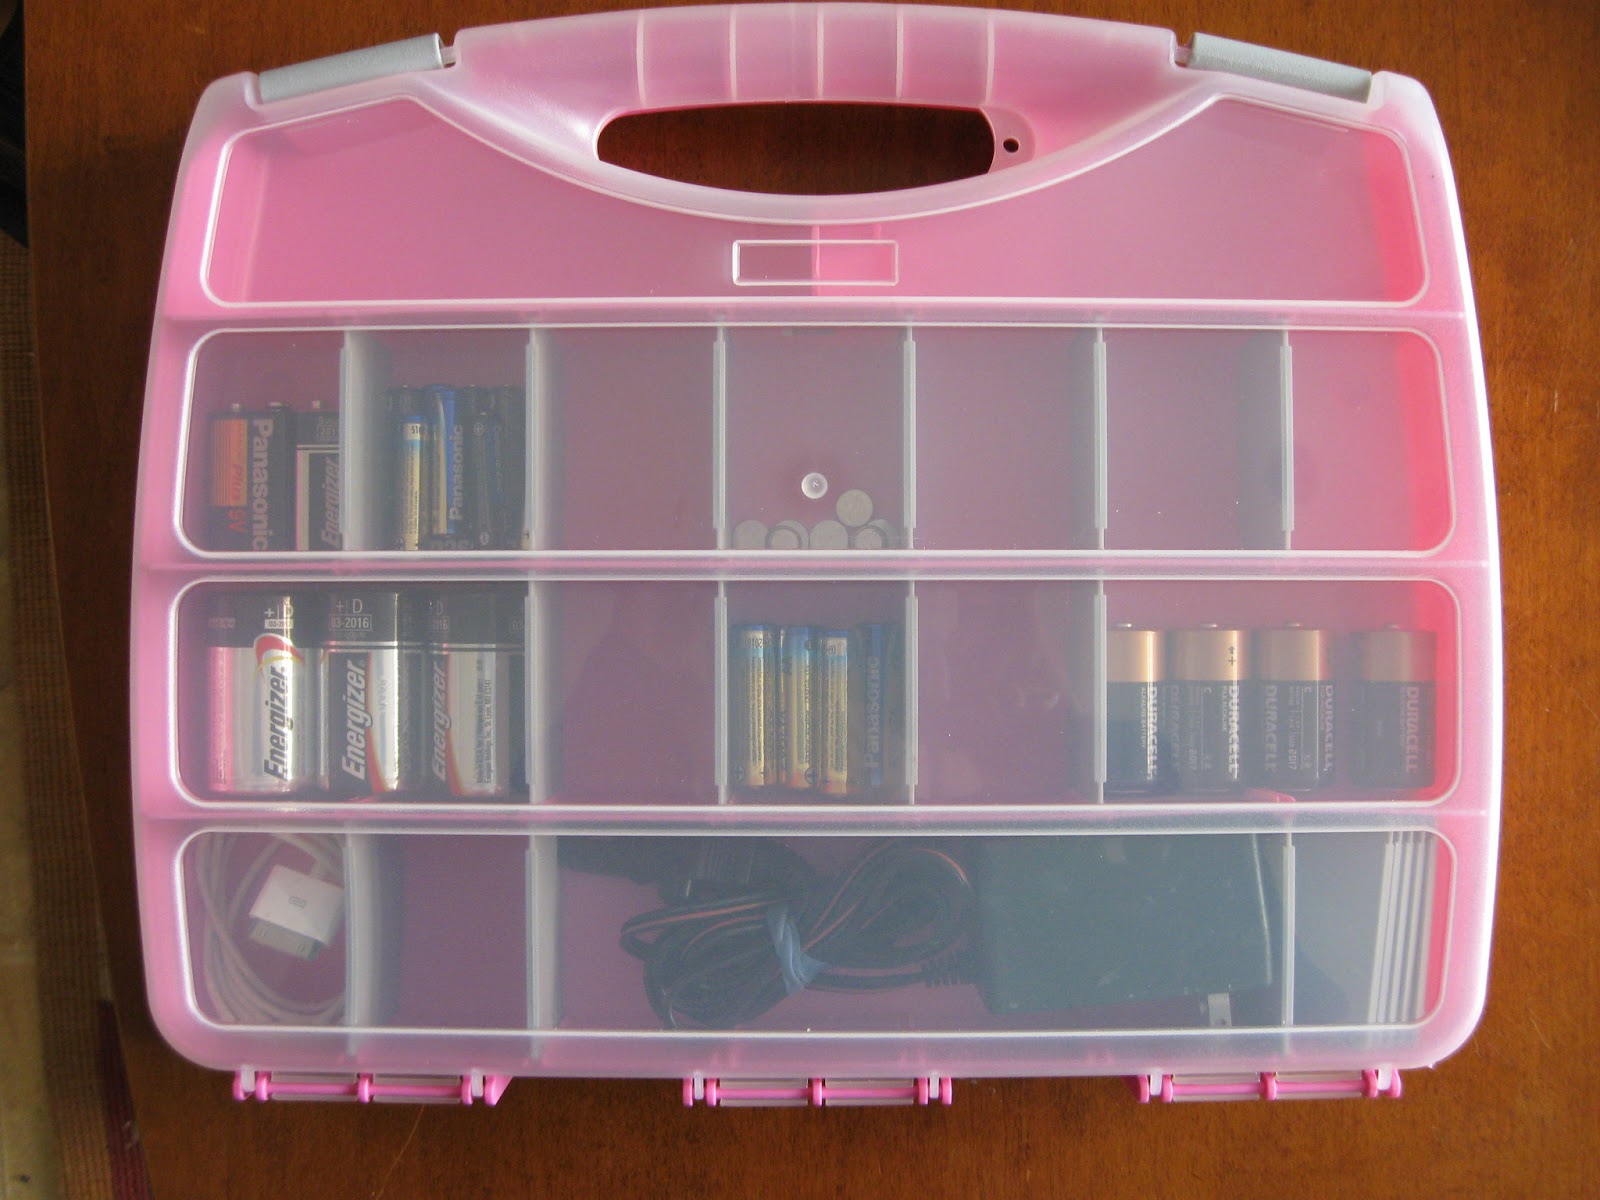
Craft Storage Box Turned Battery/Charging Storage

Hello Friends!  No I haven't abandoned my blog!  I've just been busy (like all of you).  Since I'm a new blogger, I'm going to have to figure out my time management sacrifice sleep in this area.  I really enjoy writing this blog and hope you enjoy reading it.

On to the project.  This one is for you OCD organizers.  I know, organizing batteries and chargers, it may seem a little over board, but it was a very simple project and got all the random batteries out of the junk drawer.

Here is what you need:


I found this at Ross for $6.99.  Ross is actually a great place to find organizing products.  They have a small selection, but some wonderful products at a much lower price.

This caddy works great because of the clear plastic (I can see what I need to stock up on), and removable dividers, so you can enlarge the storage space.  It also seals all the individual sections when you close the lid, so the batteries and chargers stay in place.

Here is what it looks like:


Here's the OCD part.  Yes, I used my label maker to categorize everything.  I know, I can't help myself.

What's inside:
-batteries
-extra IPod charger
-accessory charger for outside gear

There's room for more chargers, and all the batteries I need to stock up on in the future.

This was a quick, simple project.  When I showed one of my besties this project, she thought it would be great for Lego Math (a homeschool method for teaching math).  I'm sure you could think of many other uses for this bin.  Here's another picture (non-labeled for the less OCD readers); I hope you enjoyed this post!

Thanks for reading, I truly appreciate it! Many blessings to you - Home Centered Girl

Thursday, April 11, 2013

Homeschool Organization - Work Boxes

Hi Readers,

I haven't done a post on homeschooling yet, but since its a big part of our family, I thought I would share an organizational trick we use that can be very helpful in focusing children and moving beyond the "are we done yet?" part of homeschooling.

NOTE: EVERYTHING IN BOLD IS A LINK.  I'M HAVING TECHNICAL ISSUES GETTING THE LINKS TO CHANGE COLOR.  JUST HOVER OVER WITH YOUR MOUSE TO FOLLOW LINK.

I got this idea from an amazing blogger,  Confessions of A Homeschooler .  If you are a homeschooler, or are considering taking the plunge, this is your new "go to" website.  She has curriculum, ideas, encouragement.  And if you are seriously thinking about homeschooling, and need help in making the decision, her 10 Day Enrichment Study was incredibly helpful in aiding my decision to provide a Christian homeschool for our family (It took me around a year to make this decision).

Now onto the workboxes, you will see printable materials in these pictures.  These are from Confessions of a Homeschooler and here is the link .  I believe the original idea is from the Sue Patrick Workbox System.  


Confessions of a Homeschooler uses clear craft organizers found at craft stores like Joann Fabrics.  I bought my metal versions at IKEA (they come in white, red, and gray?).  One of my best friends found wood ones at a liquidation store.  Basically you just need something with at least 6 drawers.

How it works:

Each drawer has 1 task in it, and all the things needed to complete that task. For example, if you wanted to give your kiddo a math worksheet, you could put the worksheet, pencil, and ruler all in that drawer.  Get the idea......

Each Drawer has a number velcroed to it.  When the child completes that drawer, they take off the number from the front of the workbox and place it on a grid on the top of the workbox.  Each grid square has velcro for them to attach it to.


Here's the cool part.  They can see on the grid, how many spaces they need to go (or workbox trays to complete) until break time, snack, computer time, you name it.  It gives them a visual reference of how far they need to go until they are done.

As referenced above, all the printable items (numbers, grid, computer time square, etc...) are from Confessions of a Homeschooler. click here for printables and explanation post.

Once I printed out the supplies, I had the items laminated and then attached velcro tabs to the back of the numbers and work box (your local printing store can laminate items rather inexpensively).  Kids need to be able to pull these off easily with out damaging them.


Now, assemble everything and you are ready to go.  Our workboxes are on wheels and rest under the desk in my office.  If you have young kids and don't want them wheeling these things all over the place, I would recommend taking the wheels off.  If you keep the wheels on, you could wheel the boxes into the kitchen while you cook and your kiddo can do school at the kitchen counter.

I hope this encourages you homeschoolers, and those considering this type of schooling.  I can tell you at this point, that the hardest point for me, so far, was making the decision!

Many blessings to you - Home Centered Girl


Tuesday, April 2, 2013

Grandma's Treasures

Hi Everyone!

Well, sometimes a creative idea gets put on hold.  When I started this blog, a generous Gem, "Auntie H", offered me her Grandmother's 3-tiered table for a project for my blog.  I was planning on painting it turquoise and giving it away to one of my nieces as a birthday present.  When I was prepping it for paint, I found an emblem and category number on the bottom of one of the tiers and started to question whether or not I should paint it.  After I did some research, I figured out that it is called a dumb waiter (very odd name), and very similar ones are rather old, like maybe a few hundred years old or more; some are quite valuable.  Her finish is in rough shape, but I'm going to have an antiques dealer check it out before I ruin give new life to the finish.  It looks like a giant cake stand.  Check it out:


So, onto a different Grandmother's treasure.  My Grandma B passed away over 6 years ago.  At the time, I was in the hospital and didn't get to travel to her funeral.  A few treasures were brought back to me that she owned and live in my kitchen where they get frequent use.  I cherish these few things I have of hers.  Oddly, a few years ago an unmarked package was sent to my Mom with two decorative birds in it that used to be in my Grandmother's home.  My Mom instantly recognized them and offered them to me.  At first glance, I didn't really care for the look of the birds, but I only have a few thing's that were hers and didn't want to pass up the treasures.  I decided to give them a fresh look with a good old can of spray paint.  If any of my cousins read this, I hope you don't cry like the transformation.

Here is the before:

That eye kind of watches you huh.... 

Here is the after:


I really like the birds now.  They are substantial and beautiful.  They are sitting on a set of my father's yearbooks that I recovered with painter's paper.  This is also significant because my father passed away a few years ago and now they support his mother's beautiful birds.  That gorgeous painting is done by one of the dearest friends I have ever been blessed to have in my life.  This little grouping of items holds some heavy sentimental weight for me and they are out in the open for me to enjoy every day.  A little dose of beauty for every day life......

Do you have a little treasure that belonged to a passed on family member that you can't bare to part with, but don't have out in the open because you don't care for it aesthetically?  A little paint, or brown painter's paper, can go a long way.

From this:
To this:


Many blessings to you, Home Centered Girl


Tuesday, March 19, 2013

5 Fast and Cheap Organizing Tips I Use In Our Home

Thank you so much for stopping by!  I realize that not everyone gets a slight endorphin rush from the word "organizing" like I do, but I hope you find these tips valuable and helpful.  I use these 5 tips in my home and they help me keep things tidy.  If you have kids around, you know how difficult that can be!

Tip 1
Small Laundry Basket At the Bottom Of the Stairs:

This gets used daily in our house.  If you have a 2-story home and a second story laundry room, this is a perfect spot for dirty dish rags, cloth napkins after dinner, random socks; any dirty laundry that accumulates during the day and you want a quick spot to place it with-out running to the hamper in the bedroom.  If you have kids, than you have laundry that magically appears out of no where.  Seriously!  This would also work perfectly for toys, books, or any other random item that needs to go upstairs and you don't feel like burning the calories taking the time to go upstairs.  When I was growing up, my Mom kept a bucket (same concept) under the kitchen sinks that she put dirty rags in and come laundry day, she would empty the bucket.  I bought this little square basket at a garage sale and spray painted it teal (I love this color right now).  Before I found it, I was using a dollar store basket.

Tip 2
Hooks:

Install hooks on the back of your doors.  We have hooks on the back of the garage door, and in both upstairs bathrooms.  Hooks help keep stuff off of the floor or from piling on other furniture.  You can hang backpacks, hats, towels, bath robes, etc...... on them.  They are inexpensive and quickly installed.  You can also find them in any finish.

Tip 3
The Squirmy Sleeper and Safety Pins


My husband was still doing this on his bed when I met him in his mid-twenties.  To keep his sheets from getting disheveled while sleeping, AND to make "making the bed" quick and easy, my Mother in law safety pinned my husband's top sheet to his blanket.  If you have kids than you know how they squirm in the middle of the night and you frequently find the top sheet at the bottom of the bed.  This solves that problem and makes putting the bed back together simple.  To make the bed, you just pull the pinned sheet/blanket to the top and done!  I have yet to find a pin "unpinned" after many years.  After all, most of us wore cloth diapers and had these things on us for a few years.  With that said, if you are putting this on a child's bed, you should do everything to ensure that they don't play with the pins.

Tip 4
IKEA Pot Rack Organizer

I fought lids for 10 years until I found this gadget.  I think I paid $5.99 max!  It works like a charm and no more dropping or searching for lids when I make dinner.  Simple and cheap! It holds 6 lids.

Tip 5
Store DVD's in a CD Case

DVD's and their cases tend to take up a lot of room on the shelf, I would personally rather look at books on a shelf than movies.  For us, this project was free because I had an extra case on hand.  I would encourage you to look at Goodwill before buying one brand new.  It takes up very little space and its easy to transport.  I put the cases away, and out of sight, for movies I think we might get rid of in the future.  Otherwise, recycle the cases and save on space.

I hope you enjoyed these tips and if you decide to try one, let me know!!!

Many blessings to you,
Home Centered Girl

Monday, March 18, 2013

Link Up Parties

So I'm learning a lot about link up parties.  I think this is how many people grow their blogs??????  Today I linked up at Tater Tots and Jello .  There were many awesome ideas.  Kind of like pinterest all on one page.

Wednesday, March 13, 2013

Dollar Store Organization - The Glove Box

Hi Everyone!

I was roaming the web and saw this idea and thought it was great.  My husband who is a mechanic by trade also really liked this idea because he has to get into peoples glove boxes from time to time to retrieve keys  (wheel lock keys?????) and often finds a mess.  So, here is a quick organization project to clean up your glove box (or jockey box as my family calls it) and also supply some very important emergency information.

So, here's what I started with:


I thought I was doing pretty well considering the papers were not just stuffed in the glove box.

Here is what I created:


How to do it:

I purchased two poly-coupon organizers at the local dollar store, one for each vehicle.  There are five pockets inside with the following labels:

Insurance: self explanatory

Registration: also self explanatory

Receipts: Currently, I have our latest emissions report in here, I would also put other important auto receipts relating to the car (I don't have many because I'm married to a mechanic and he does all our car work; I know, I'm very fortunate).

Passengers: In this section, I have listed all the names of my family and our date of births on a 3x5 note card, just in case we were in an accident and someone was knocked unconscious and couldn't communicate.

Emergency Contacts: This section also contains a 3x5 card with names and telephone numbers of who to call in the event of an emergency.


I made a label, with red ink, for the front that reads: "Auto & Emergency Contact Information" in big letters so that hopefully it is obvious if someone other than myself needs info out of the glove box.

You could also say.......... that it would make things a little easier if you just so happened to get pulled over for speeding or texting (okay, you know you deserve it if you're texting and driving).  A little less sorting through a mess to find what you need.

There it is, a simple and CHEAP organizing project.


Many blessings to you!  Home Centered Girl.

p.s. you can also see this project and many other fun ones over at Not Just A Housewife (click here)

Tuesday, March 5, 2013

DIY Mason Jar Soap Dispenser

Hello!  Today I'm going to give you a tutorial on making a mason jar soap dispenser.  Well, this idea is definitely not original, I've seen it on a few places over blog land, but I really like that it has a "home-made" unique look.  The best part for me was that the total cost was FREE!  I just used supplies I had around the house.  Here is what you need to make this one:

-canning jar
-canning ring (screws on the outside of the jar to hold lid on)
-canning lid
-pump (I used one from an old lotion bottle)
-hot glue gun
-spray paint
-something to make a hole in the canning lid (Mr. Home Centered drilled a hole in the middle and then used metal shears to expand it so that the pump would fit inside).
-scrap book paper
-something to water proof the scrap book paper

The Process:
First I spray painted the pump and canning ring with a black glossy spray paint.  Yes, the spray paint had a little hard time sticking to the plastic pump.  This is my one lesson learned in this process.  Ideally, you want to use a pump that is already the color you want for the dispenser.  I will be keeping my eye out for a black pump.  For now, the spray paint and touch up black marker are working for me.

Next, I had my husband drill a hole in the lid and then expand it with shears so that the pump could fit inside.  CAUTION: you should protect your eyes with safety glasses if you are using a drill, and be careful with your hands.  This process creates some sharp metal edges.
And, yep; he's a total Keeper!

Next, use the canning lid as a template and cut the scrap book paper to fit.  To water proof it, I used my laminator.  If you don't have a laminator, you could whip up a home made modge podge mixture using Elmer's glue and water; paint the paper with the mixture (front and back) and let it dry.  If you're an artist, you might have some gel medium laying around which would have the same effect.  Or, the local printing store would water proof this tiny piece of paper for less than a dollar.  It is going to get wet when you wash your hands, so you want to protect it.  Another idea would be to use some kind of plastic film for the top.  An overhead projector sheet would do the trick.  Just be creative.  You can probably find a solution  in your home somewhere.
****** you could skip this step entirely by just spray painting the lid as well******* 

Now you need to attach the pump to the lid.  I used a large "blob" (technical term) of hot glue.

Now you assemble!


Pretty simple huh?  What do you think; would you make one in your own home?

Thursday, February 28, 2013

Reusable Daily List - Mounted to the Fridge

Hello Readers,

It's been a little longer than I like in between posts.  What can I say, life is busy for everyone. :)  Today I wanted to share with you an idea I got off of another blog I love iheartorganizing.blogspot.com.  The writer, Jen, made a Daily Duties Check-Off List click here that she attached to her fridge.  I loved her idea and created one of my own.  Here's the project:


What it is:
A framed check-off list of daily, weekly, bi-monthly, quarterly, and bi-annual duties that's attached to the fridge.  I use wet erase markers to check off items and erase/re-use the next day.

If you love to make lists (or need to in order to remember things).  You might really love this idea.  It's also an answer to constant sticky notes or random lists on the kitchen counter. Instead of using paper, you use wet erase markers on the glass of the frame.

How I made it:
I used a 10 x 13 frame I purchased at a garage sale (I think I spent $1); it had a mat inside of it.  I actually used the mat (which I painted yellow) for a while, but now I have a regular 8 x 11 sheet of paper (the check off list) mounted on a piece of scrapbook paper and cut to fit the frame.

Next came attaching it to the fridge.  I used 3M removable hanging strips that I attached to the back of the frame and fridge.  These are supposed to come off the fridge without damaging it and the ones I purchased hold around 10 pounds.  I found these strips at Joann Fabrics. 

I made a list (in Excel) that has check off boxes with the following categories:

Daily Duties: making the bed, cleaning the kitchen, sweeping the floor, defrosting dinner, blank lines so that I can add things to remember (phone calls, etc...).  It's a daily list of things I like to complete in order to feed my OCD method and order cravings.  I also have a section where I record due dates for library books from the local public library and church library.

Weekly Duties: This includes vacuuming upstairs, wiping down bathroom counters, cleaning toilets, laundry, anything I do about once a week.  In the summer, this list includes outdoor activities such as mowing the lawn (hubby's activity), fertilizing plants, and weeding the garden.

Bi-Monthly Duties: This list includes: mopping the floors, thoroughly cleaning the bathrooms, making my grocery menu, cleaning out the fridge, clean out the microwave, washing the sliding glass doors, etc.

Quarterly Duties: This section includes dusting the top of the fridge and ceiling fan,  vacuuming the inside of the couch (my husband is rather particular about this, he says that he had a "bad experience" whatever that means :)), and laundering the bathroom rug.

Bi-Annual Duties: this includes changing the furnace and fridge filters, cleaning out the garage, and sorting through all of our clothes.


On the list itself:
Each item has a box to be checked off and I recommend you use a wet erase marker.  Dry erase markers work, but they don't have a fine point.  I purchased my wet erase markers at a local office supply store.  You know, those markers your teacher used on the old school projectors in primary school and then wiped off with a wet rag.

FEATURE!!!  I'm so excited to show you the version one of my best friends, a fellow God Fearing OCD Creative, made of this project.  You know all those pops of aqua and chartreuse green that are popping up all over home decor.  My friend, "Lizard" (that's her nickname, but she's actually a gorgeous blond), used this project as an opportunity to introduce those colors to her kitchen.  She transformed a goodwill frame with a little paint and used the same method (3M strips) to mount it to the side of her fridge.  Check it out (see the aqua coming through under the green):


This chick is so creative around her house.  I'll be begging to feature some of her other DIY projects.  She has the best ideas and vision when it comes to art and creative projects.

So what do you think?  If the exhaustive list is not for you, I think the frame could be filled with blank paper instead and could still be used as a place to list out items/duties you need to remember to complete on any given day.  Maybe even a sheet of paper with ten lines numbered 1., 2., 3.,.......  You could say its a green approach for the compulsive list maker.

Leave me a comment if you liked this post or think you'll attempt a similar project.  If you would like me to email you a copy of the list I created in Excel for you to use at home, leave me a comment or message me on Facebook.

So here it is again:


God bless you!  Home Centered Girl